> ## Documentation Index
> Fetch the complete documentation index at: https://docs.lintkit.com/llms.txt
> Use this file to discover all available pages before exploring further.
# Quickstart
> Install LintKit and run your first scan in under a minute
## Install the plugin
Open the Figma desktop app or web app and open any design file.
Go to **Plugins > Community**, search for **LintKit**, and click **Install**.
Or open the [LintKit plugin listing](https://www.figma.com/community/search?resource_type=plugins\&q=LintKit) directly.
Right-click the canvas, select **Plugins > LintKit**, or go to **Plugins > LintKit > Open LintKit** from the menu bar.
## First-run setup
The first time you open LintKit, a short setup wizard walks you through connecting your Figma account and detecting your libraries. You can skip everything and come back later — all 27 detection rules work without any setup.
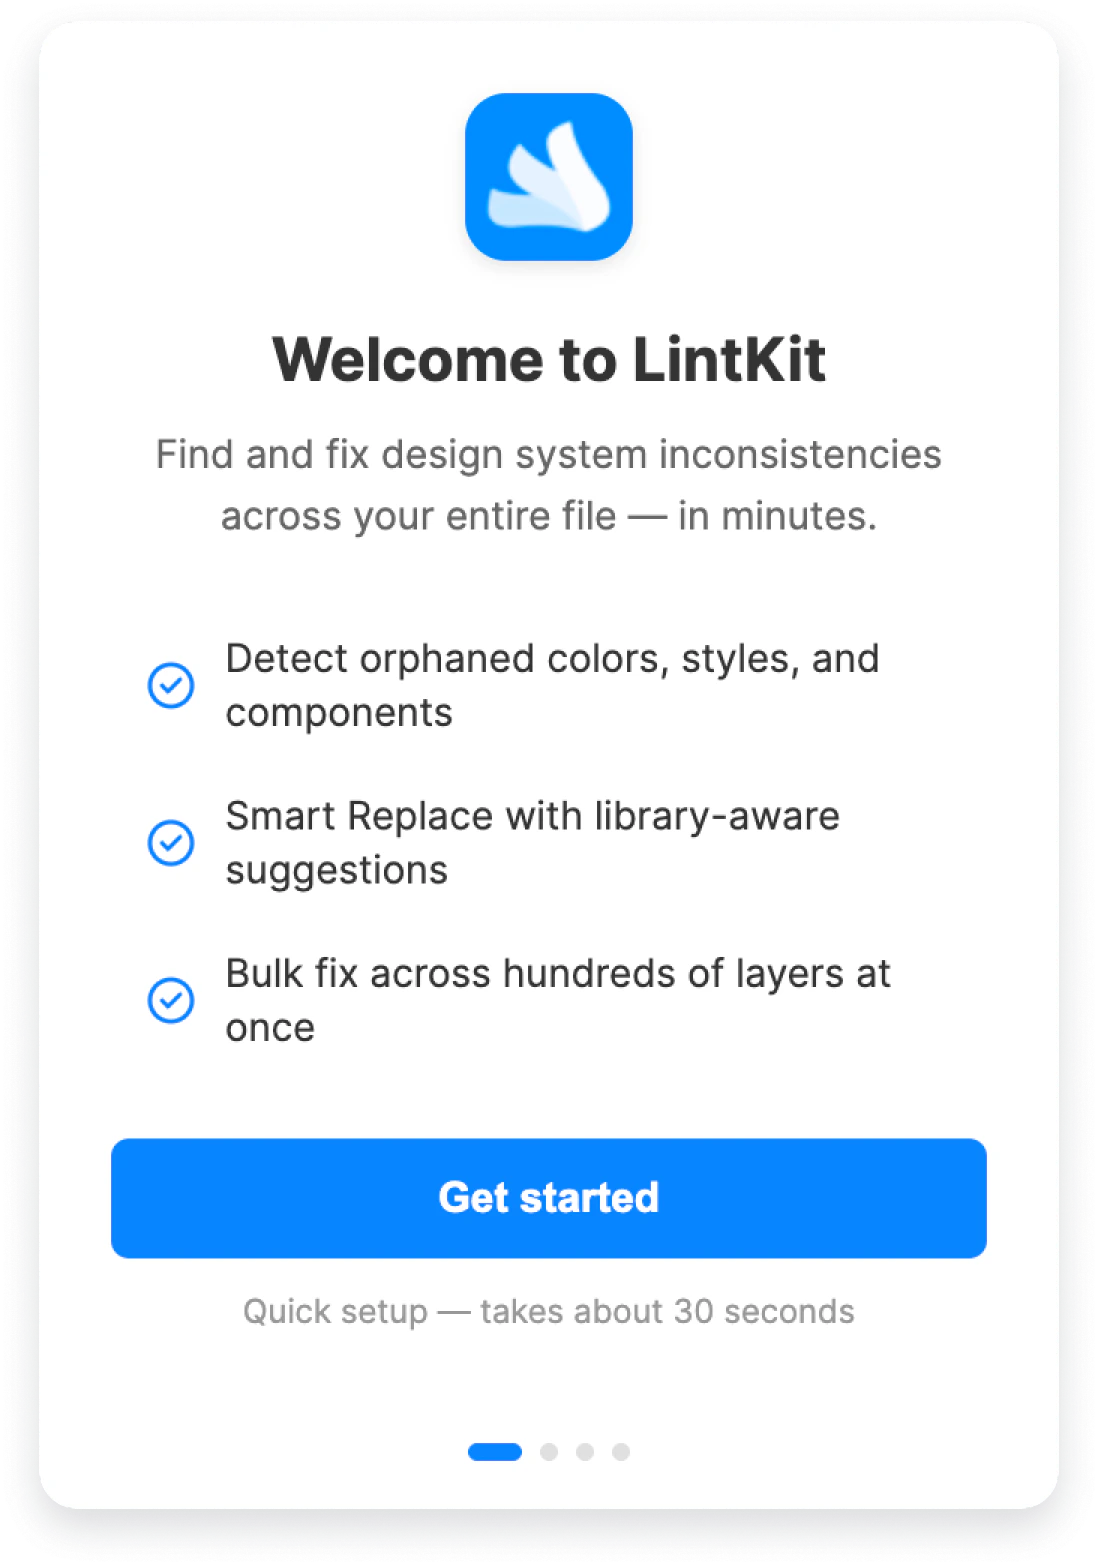 Click **Get started** to begin.
### Connect your Figma token (Step 1 of 2)
Click **Get started** to begin.
### Connect your Figma token (Step 1 of 2)
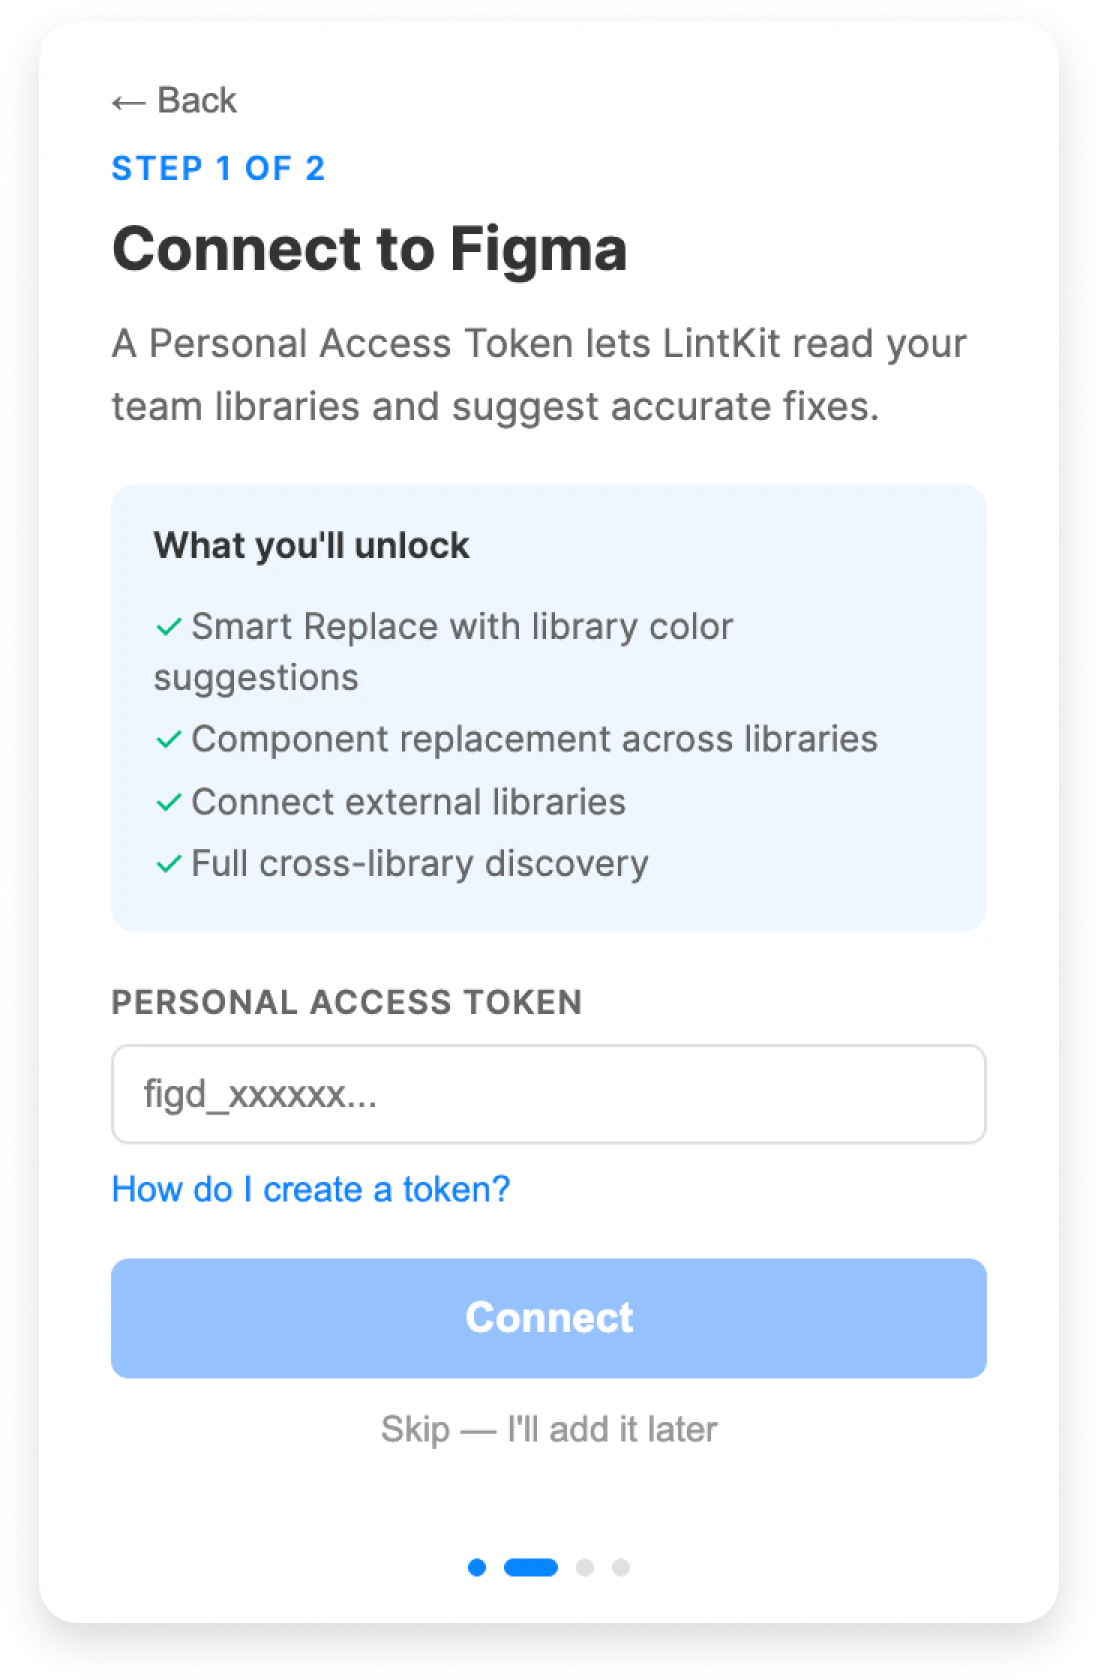 LintKit asks for a **Figma Personal Access Token (PAT)**. The token is optional — skip it if you just want to try the plugin. But connecting one unlocks library-aware features:
* **Smart Replace** suggestions that match orphaned styles to your library
* **Component replacement** across libraries
* **Cross-library discovery** for deeper style matching
* **External library URLs** (paste a library file link to load it)
You can always add or change your token later in **Settings**.
#### How to create a token
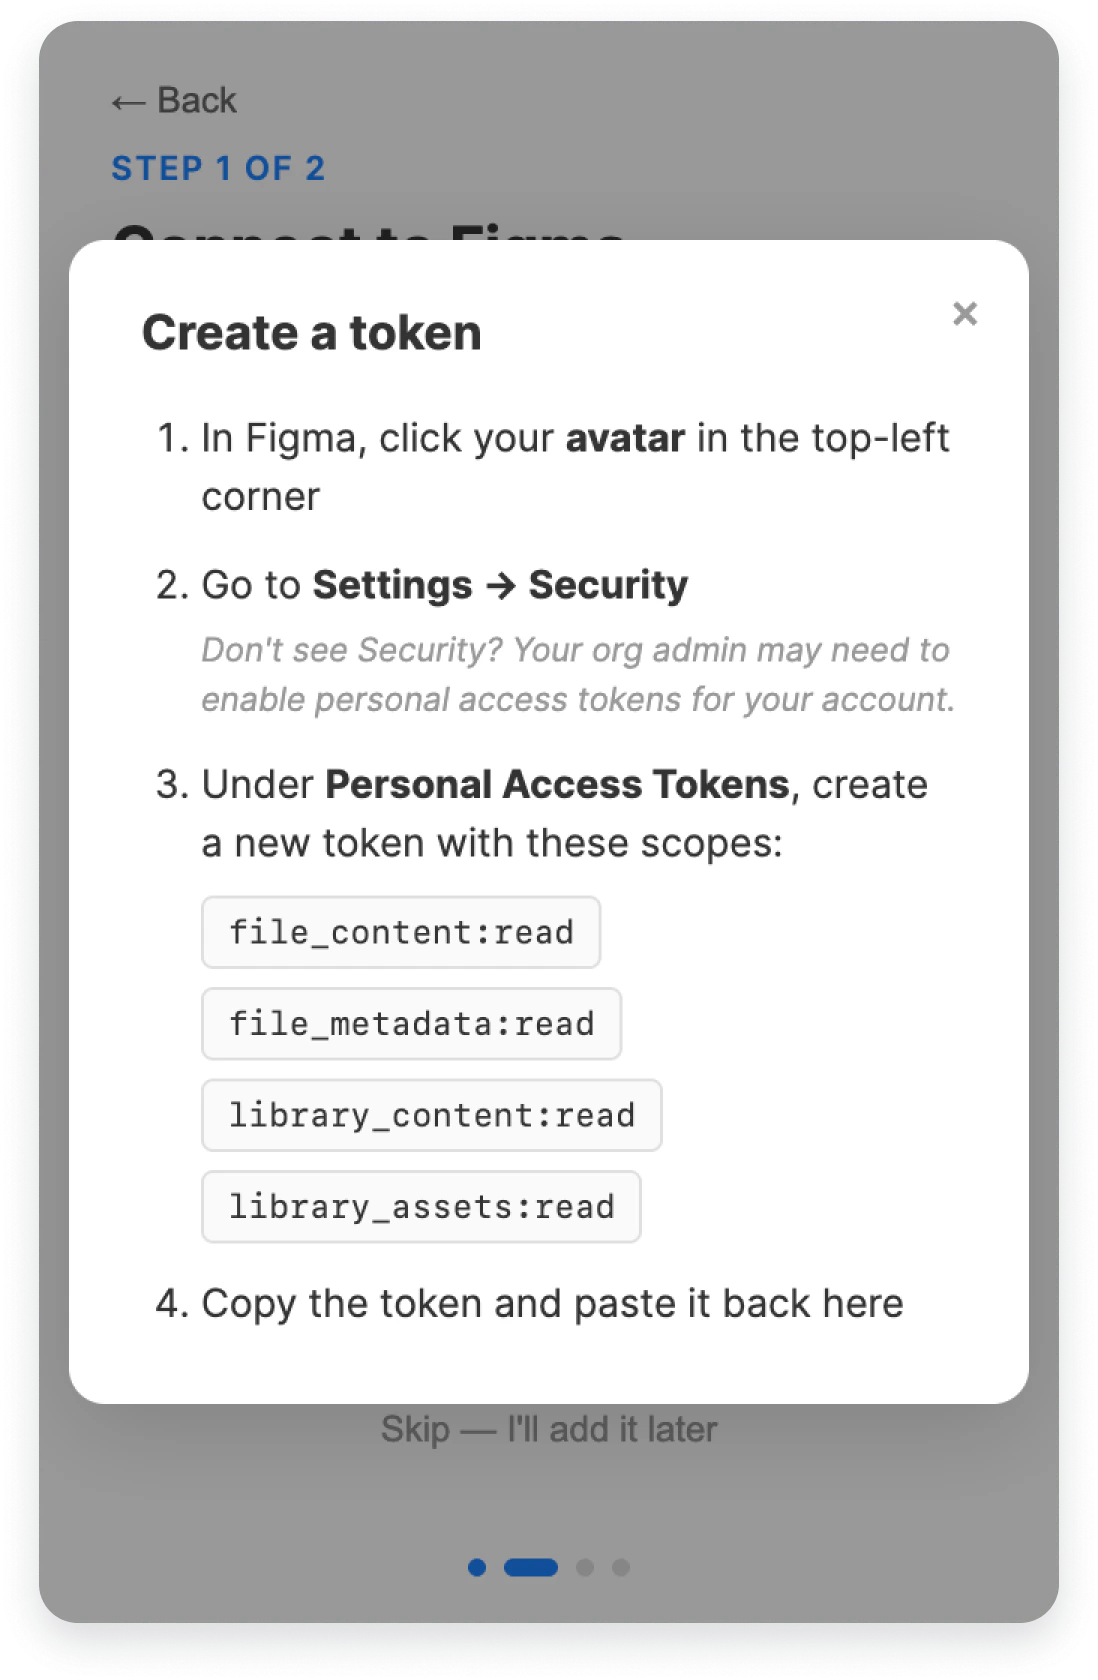
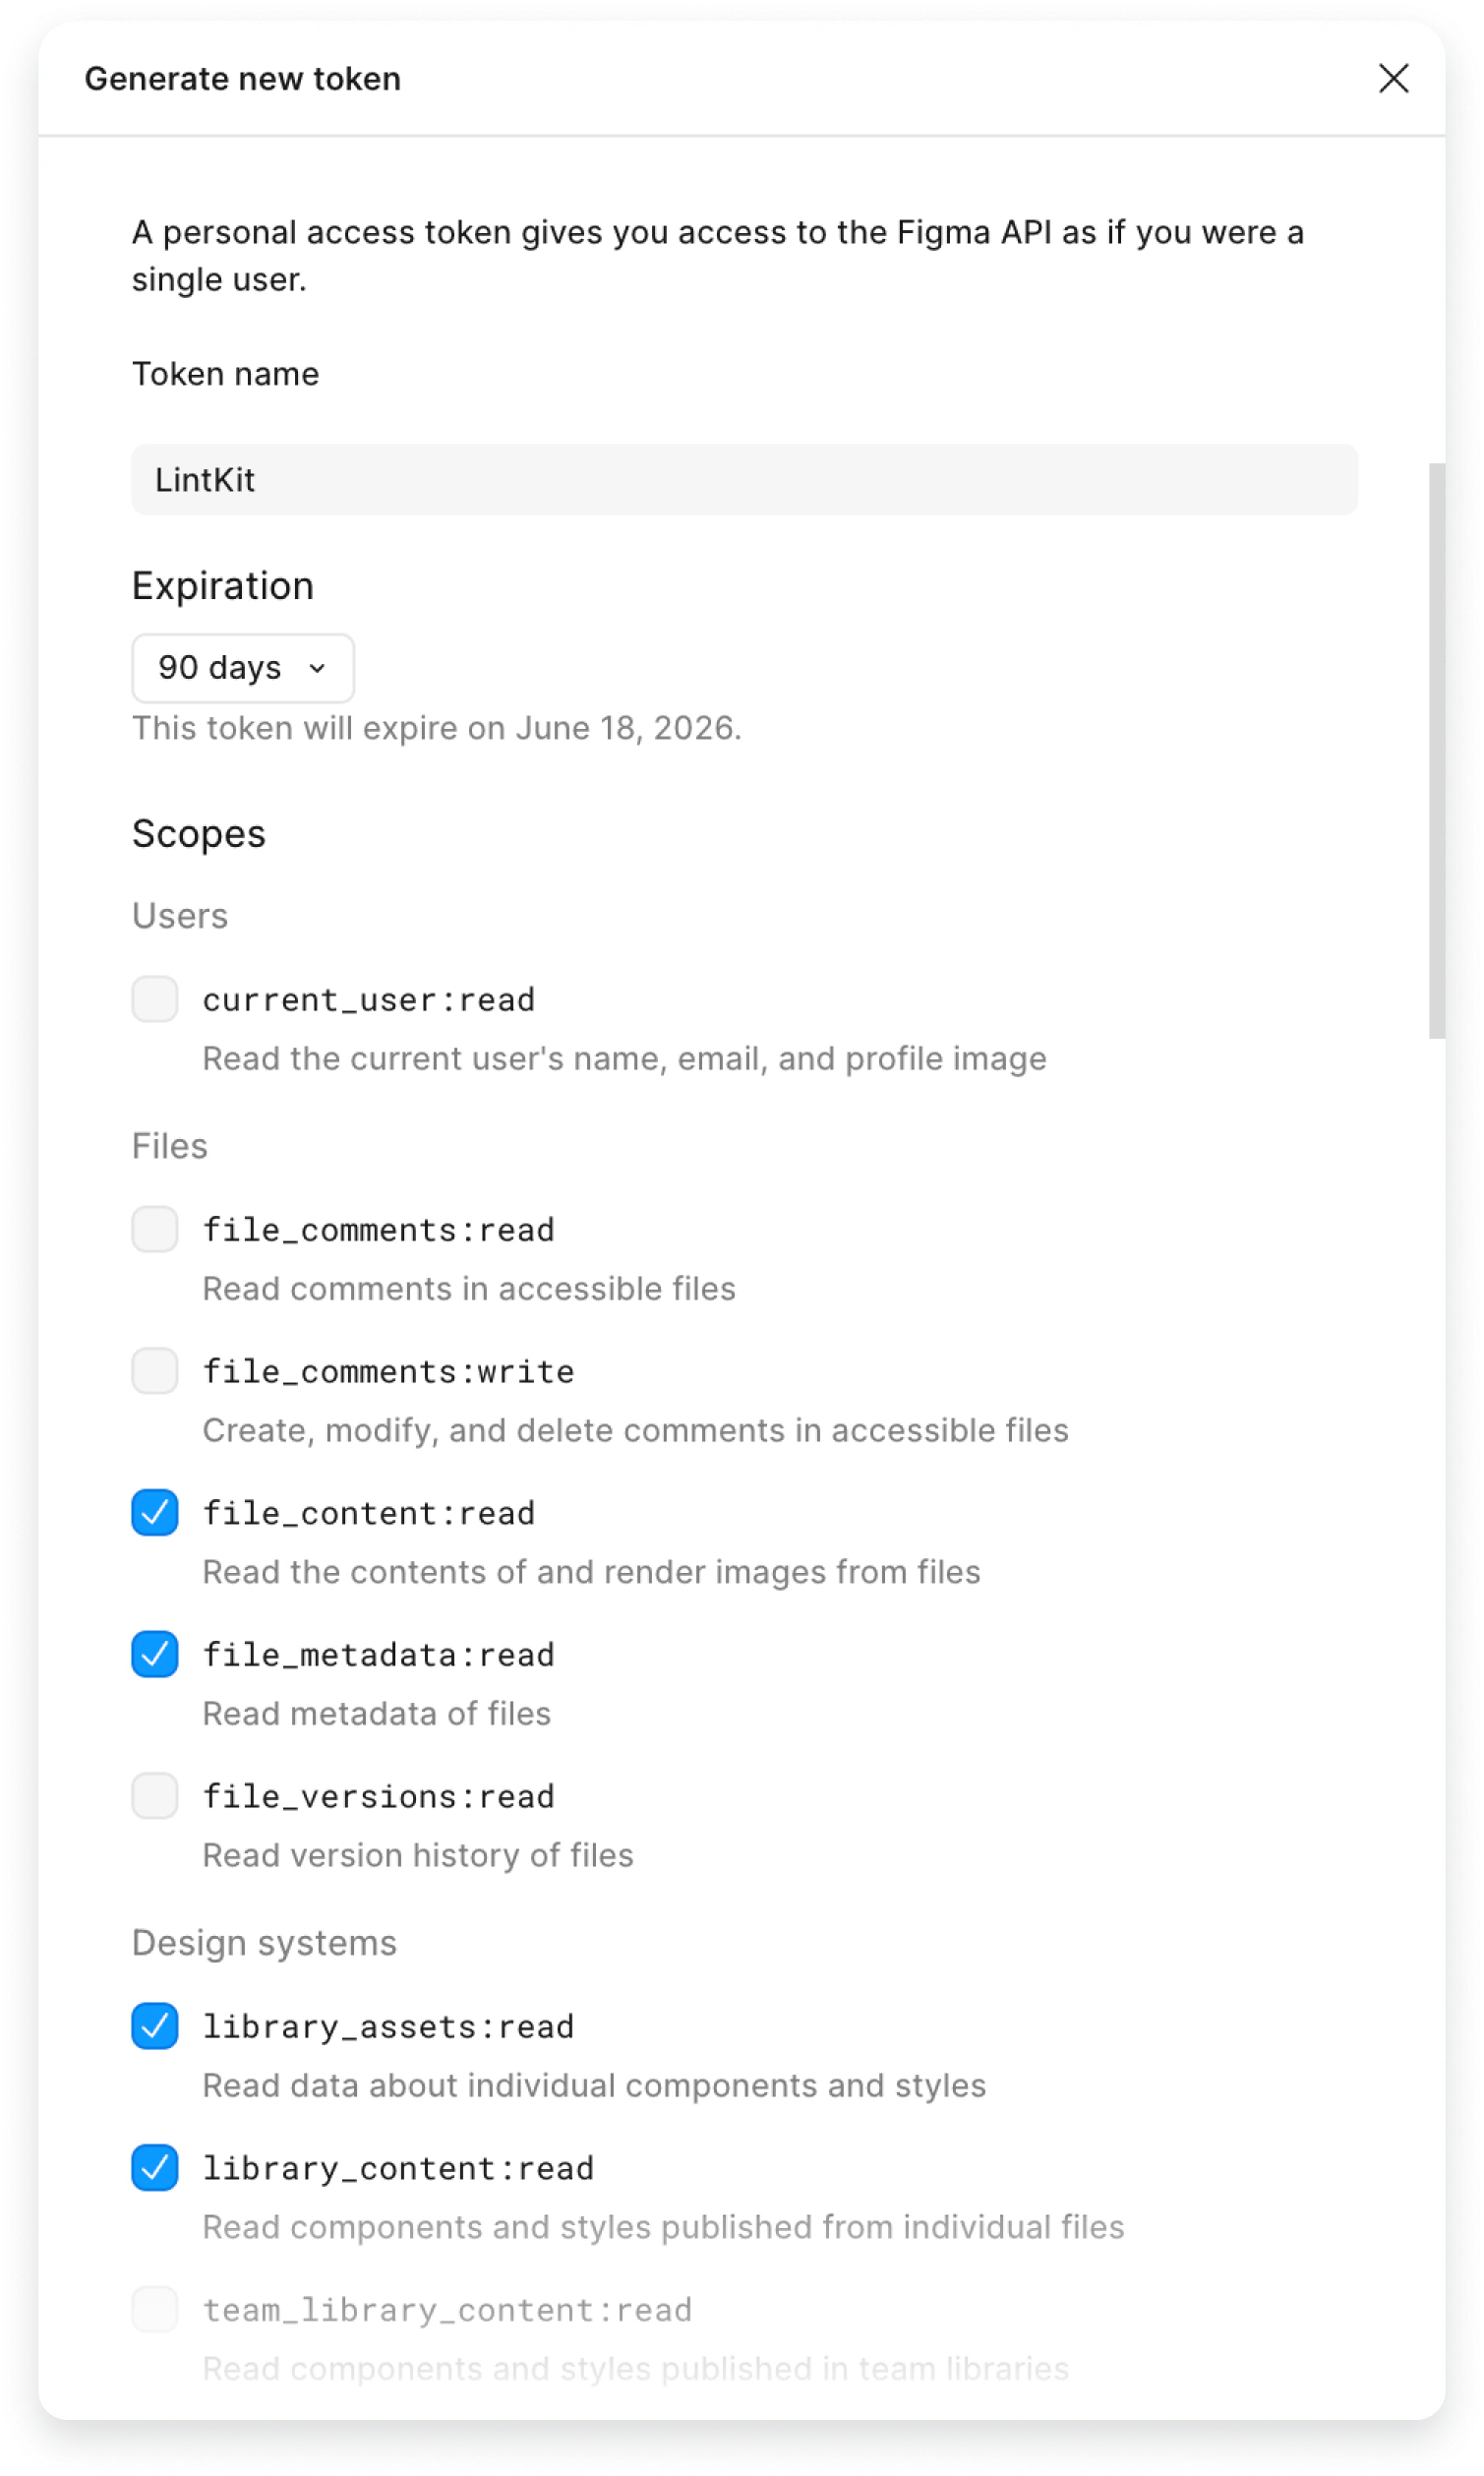
Click **"How do I create a token?"** in the wizard to see step-by-step instructions. Here's what the LintKit helper and the Figma token screen look like side by side:
Your token needs these four scopes:
| Scope | Why LintKit needs it |
| ---------------------- | --------------------------------------------------------------- |
| `file_content:read` | Read layer data for style and component matching |
| `file_metadata:read` | Read file names and structure for library discovery |
| `library_content:read` | Access published styles and components from team libraries |
| `library_assets:read` | Resolve style keys to file locations for cross-library features |
Figma doesn't allow editing scopes on an existing token. If you're missing a scope, you'll need to create a new token with all four.
Paste your token into the input field and click **Continue**.
### Your libraries (Step 2 of 2)
LintKit asks for a **Figma Personal Access Token (PAT)**. The token is optional — skip it if you just want to try the plugin. But connecting one unlocks library-aware features:
* **Smart Replace** suggestions that match orphaned styles to your library
* **Component replacement** across libraries
* **Cross-library discovery** for deeper style matching
* **External library URLs** (paste a library file link to load it)
You can always add or change your token later in **Settings**.
#### How to create a token
Click **"How do I create a token?"** in the wizard to see step-by-step instructions. Here's what the LintKit helper and the Figma token screen look like side by side:
Your token needs these four scopes:
| Scope | Why LintKit needs it |
| ---------------------- | --------------------------------------------------------------- |
| `file_content:read` | Read layer data for style and component matching |
| `file_metadata:read` | Read file names and structure for library discovery |
| `library_content:read` | Access published styles and components from team libraries |
| `library_assets:read` | Resolve style keys to file locations for cross-library features |
Figma doesn't allow editing scopes on an existing token. If you're missing a scope, you'll need to create a new token with all four.
Paste your token into the input field and click **Continue**.
### Your libraries (Step 2 of 2)
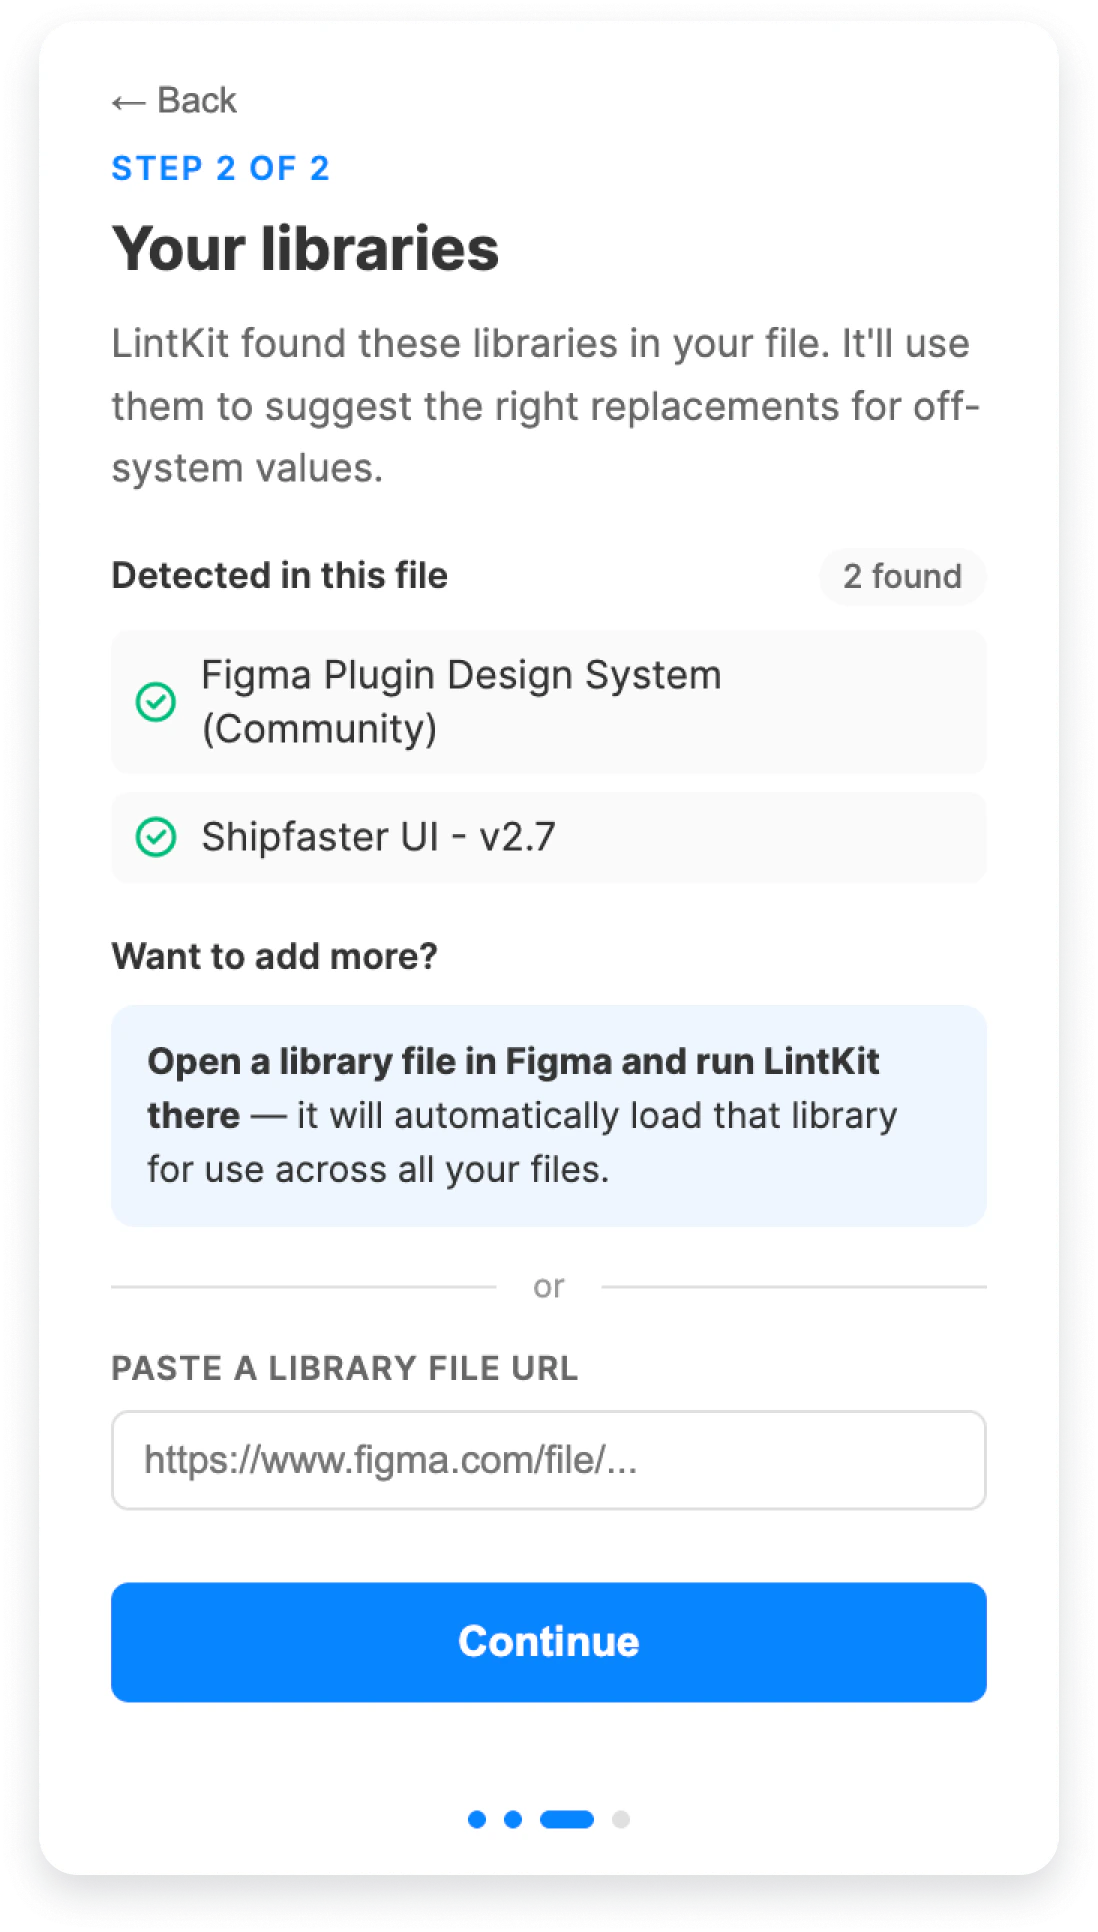 LintKit shows any libraries you've already registered. Libraries are not auto-detected from your file — you add them explicitly.
Two ways to add libraries:
1. **Open a library file in Figma and run LintKit there.** LintKit registers that library automatically for all your files — no token needed.
2. **Paste a library file URL.** Enter the URL in the input field and LintKit pulls in that library's styles and components. This requires a connected token (the input is disabled without one).
Using a component from a library in your working file is not enough to register that library. You must add it by URL or run LintKit inside the library file.
### Ready to scan
LintKit shows any libraries you've already registered. Libraries are not auto-detected from your file — you add them explicitly.
Two ways to add libraries:
1. **Open a library file in Figma and run LintKit there.** LintKit registers that library automatically for all your files — no token needed.
2. **Paste a library file URL.** Enter the URL in the input field and LintKit pulls in that library's styles and components. This requires a connected token (the input is disabled without one).
Using a component from a library in your working file is not enough to register that library. You must add it by URL or run LintKit inside the library file.
### Ready to scan
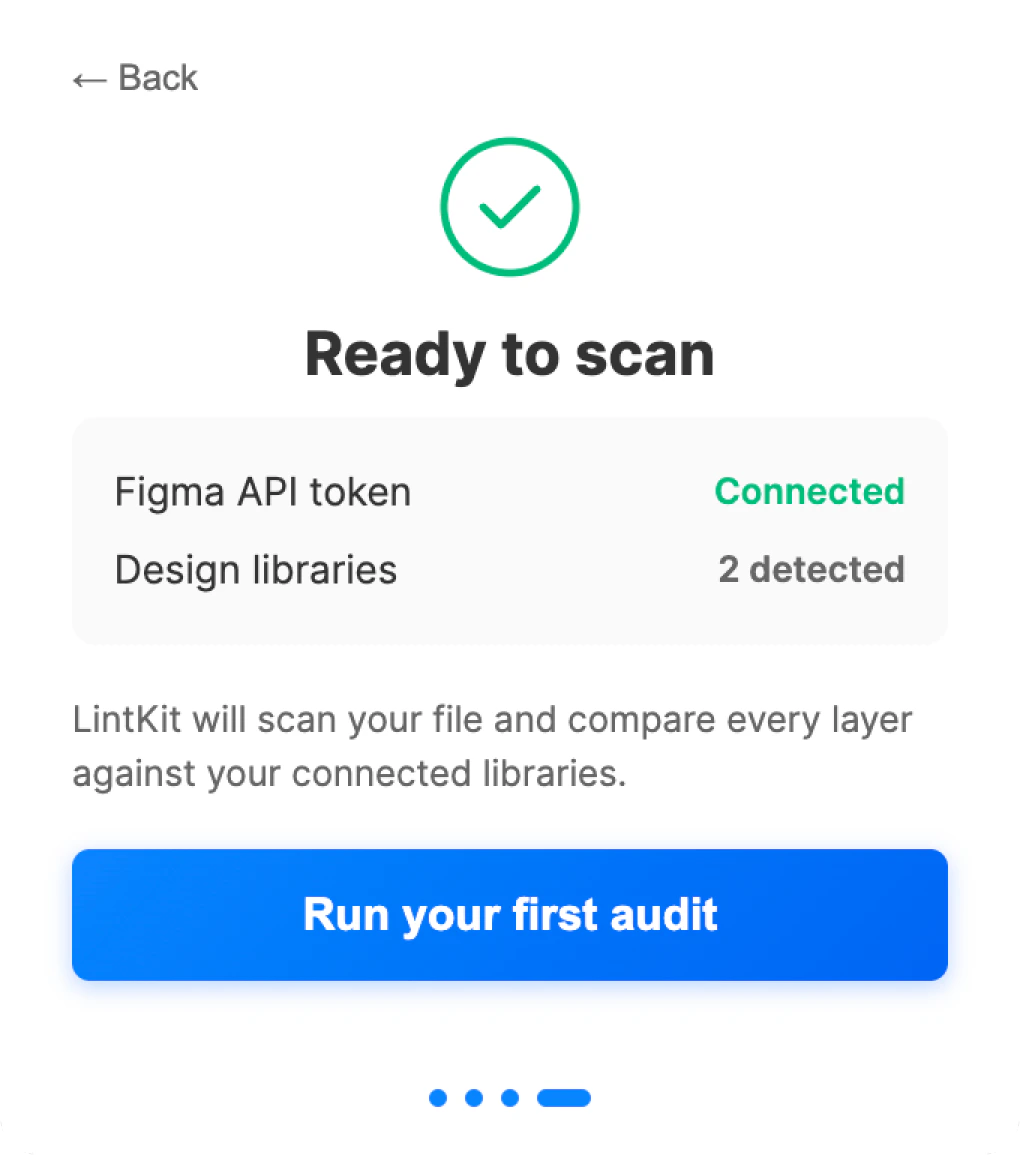 The final screen shows what you configured — token status and library count. Click **Run your first audit** to dismiss the wizard and start scanning your file.
## Understand the plugin layout
The final screen shows what you configured — token status and library count. Click **Run your first audit** to dismiss the wizard and start scanning your file.
## Understand the plugin layout
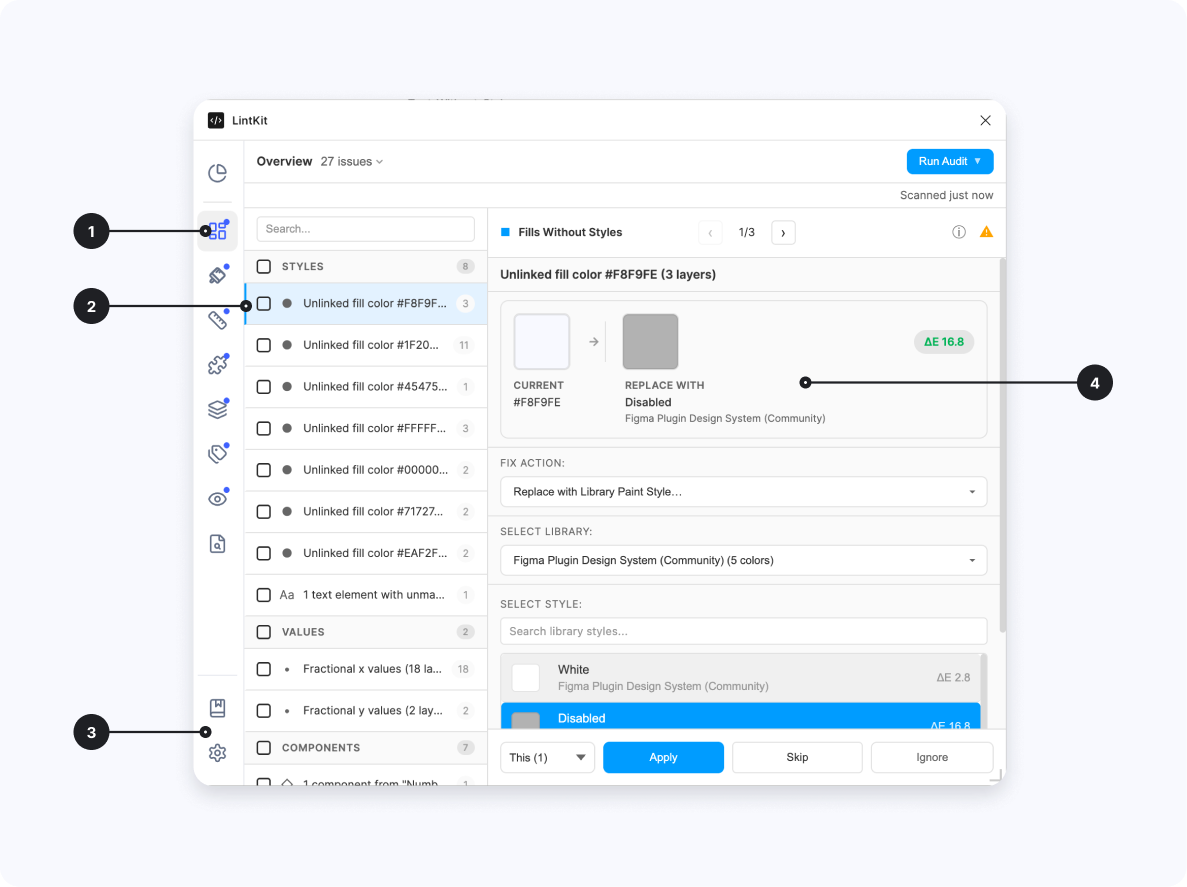 When LintKit opens, you see four main areas:
1. **Left Navigation Tabs** — categories like Styles, Values, Components, Structure, Naming, and Accessibility. Click a tab to see findings for that category only.
2. **Findings list** — each finding describes one inconsistency, grouped by rule. Click a finding to select the affected layers on the canvas.
3. **Settings and Docs** — access rule configuration and documentation from the bottom of the navigation rail.
4. **Inspector Panel** — when you click a finding, a detail panel opens on the right showing the finding summary, affected nodes, and available fixes.
The plugin adapts to your window size. Resize it wider to see the full navigation rail, or keep it narrow for a compact view. See [Compact view](/features/compact-view) for details.
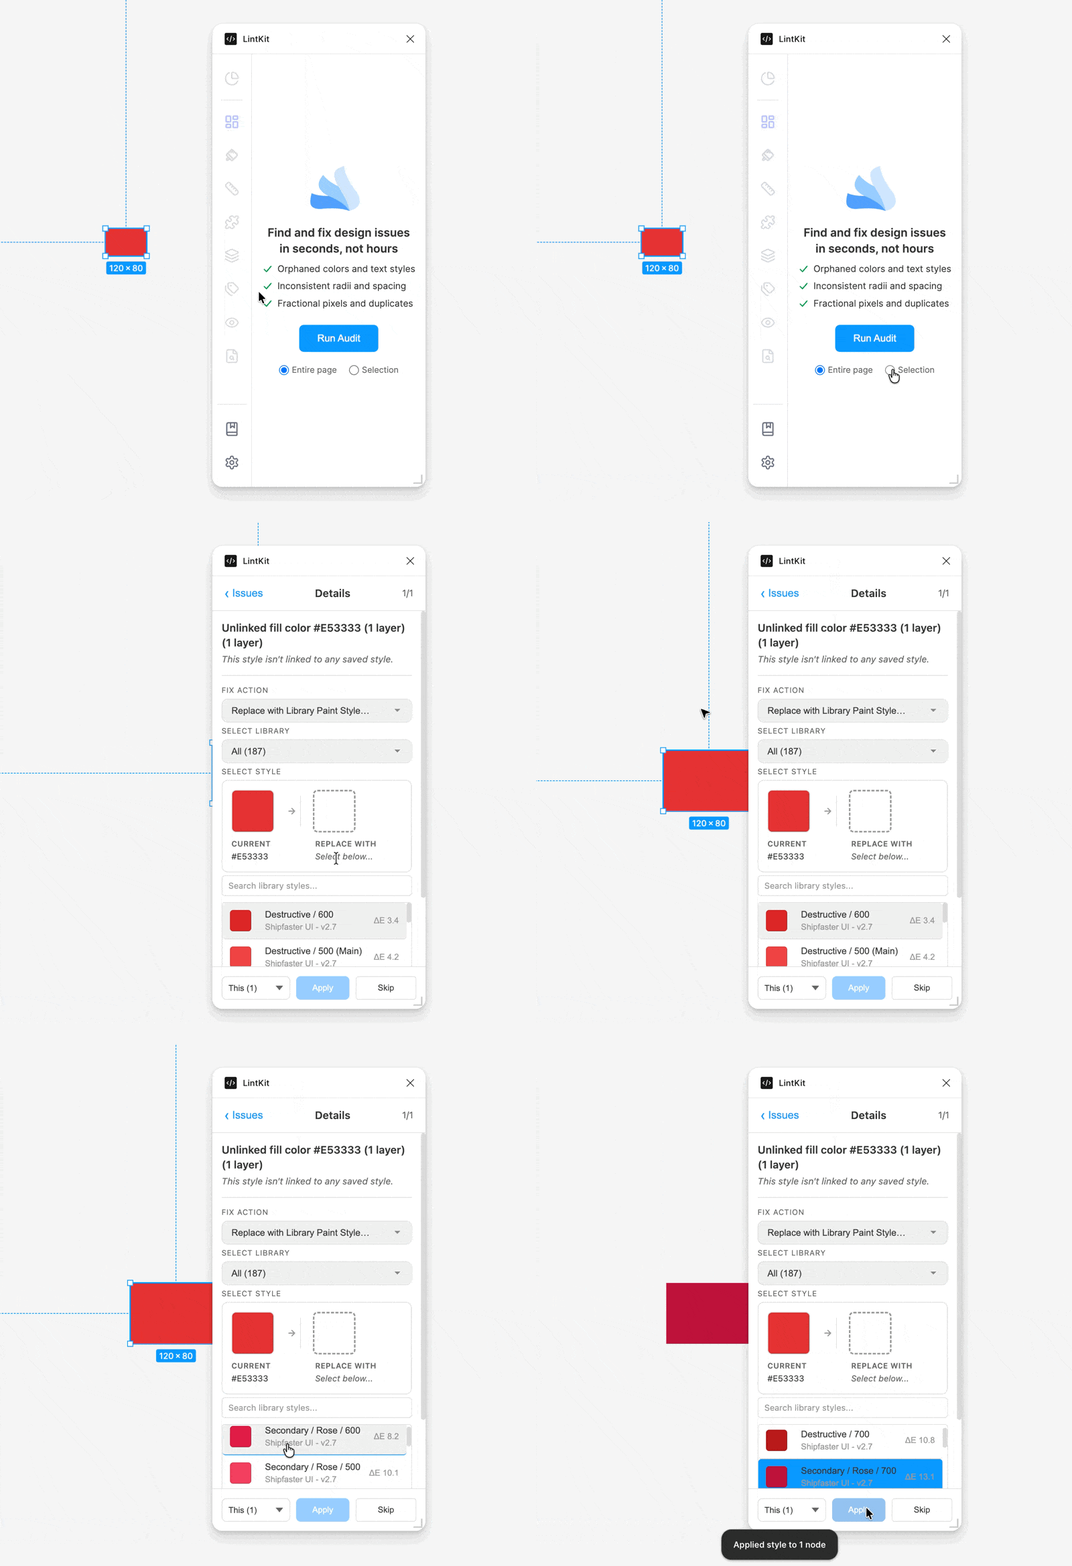
## Run your first scan
LintKit scans the current page automatically when it opens. You don't need to click anything.
After the scan completes, you see:
When LintKit opens, you see four main areas:
1. **Left Navigation Tabs** — categories like Styles, Values, Components, Structure, Naming, and Accessibility. Click a tab to see findings for that category only.
2. **Findings list** — each finding describes one inconsistency, grouped by rule. Click a finding to select the affected layers on the canvas.
3. **Settings and Docs** — access rule configuration and documentation from the bottom of the navigation rail.
4. **Inspector Panel** — when you click a finding, a detail panel opens on the right showing the finding summary, affected nodes, and available fixes.
The plugin adapts to your window size. Resize it wider to see the full navigation rail, or keep it narrow for a compact view. See [Compact view](/features/compact-view) for details.
## Run your first scan
LintKit scans the current page automatically when it opens. You don't need to click anything.
After the scan completes, you see:
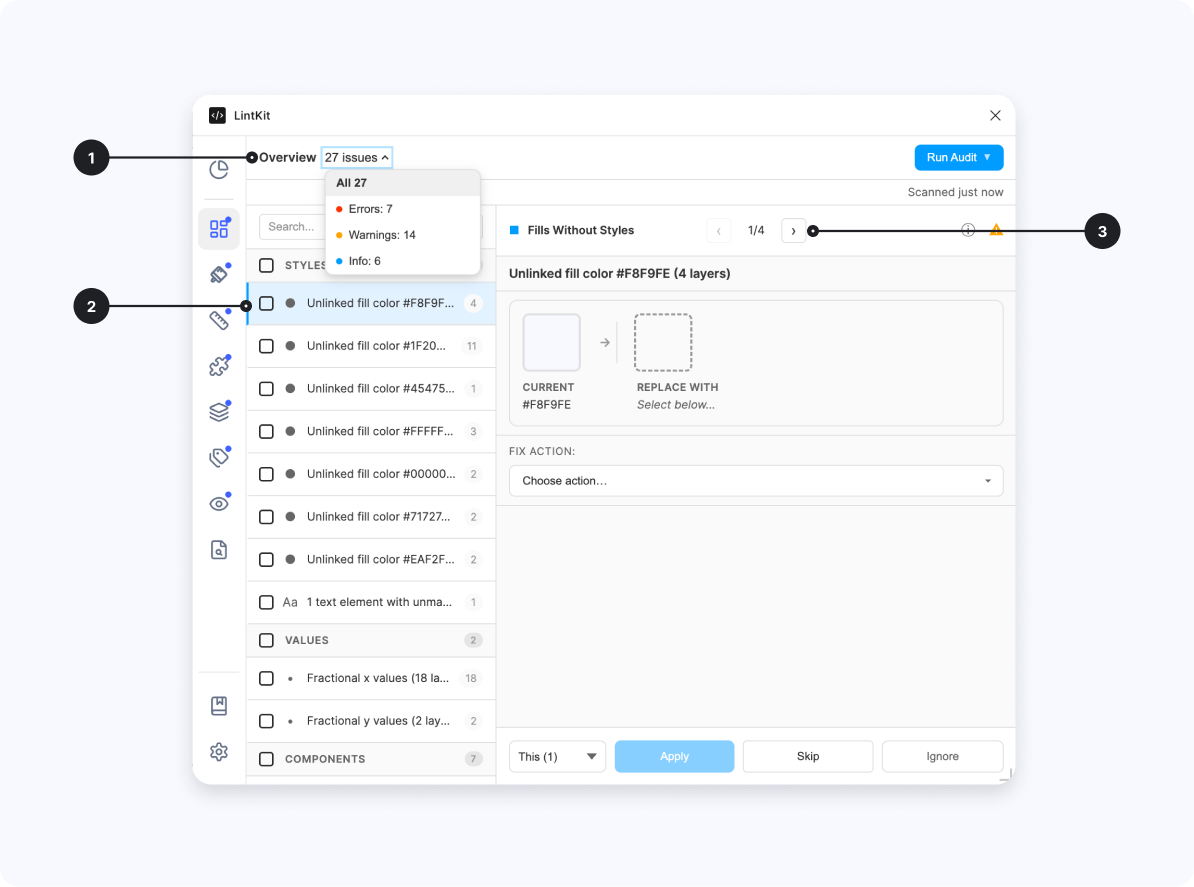 1. **Severity selector** — filter findings by error (red), warning (yellow), or info (blue)
2. **Rule violation row** — each finding describes one inconsistency, grouped by rule (e.g., "Fills without styles")
3. **Node count per finding** — shows how many layers are affected by each rule violation
LintKit scans the current page by default. Hidden and locked layers are skipped unless you enable them in [configuration](/configuration).
### Scanning a selection
To scan only specific layers instead of the whole page:
1. Select one or more layers on the canvas
2. LintKit automatically re-scans your selection
3. Findings update to show only what's relevant to the selected layers
1. **Severity selector** — filter findings by error (red), warning (yellow), or info (blue)
2. **Rule violation row** — each finding describes one inconsistency, grouped by rule (e.g., "Fills without styles")
3. **Node count per finding** — shows how many layers are affected by each rule violation
LintKit scans the current page by default. Hidden and locked layers are skipped unless you enable them in [configuration](/configuration).
### Scanning a selection
To scan only specific layers instead of the whole page:
1. Select one or more layers on the canvas
2. LintKit automatically re-scans your selection
3. Findings update to show only what's relevant to the selected layers
 ## Explore findings
Click any finding in the results list to:
1. **Select the affected layers** on the canvas — LintKit highlights them so you can see exactly where the problem is
2. **Open the inspector** — a detail panel showing the finding's summary, affected node count, and available fixes
3. **Navigate between nodes** — if the finding affects multiple layers, click individual nodes in the inspector to jump between them
Use **Shift+click** to select multiple findings. This is useful for reviewing a group of related findings before deciding how to fix them.
## Fix a finding
Once you've selected a finding, the inspector shows your fix options:
## Explore findings
Click any finding in the results list to:
1. **Select the affected layers** on the canvas — LintKit highlights them so you can see exactly where the problem is
2. **Open the inspector** — a detail panel showing the finding's summary, affected node count, and available fixes
3. **Navigate between nodes** — if the finding affects multiple layers, click individual nodes in the inspector to jump between them
Use **Shift+click** to select multiple findings. This is useful for reviewing a group of related findings before deciding how to fix them.
## Fix a finding
Once you've selected a finding, the inspector shows your fix options:
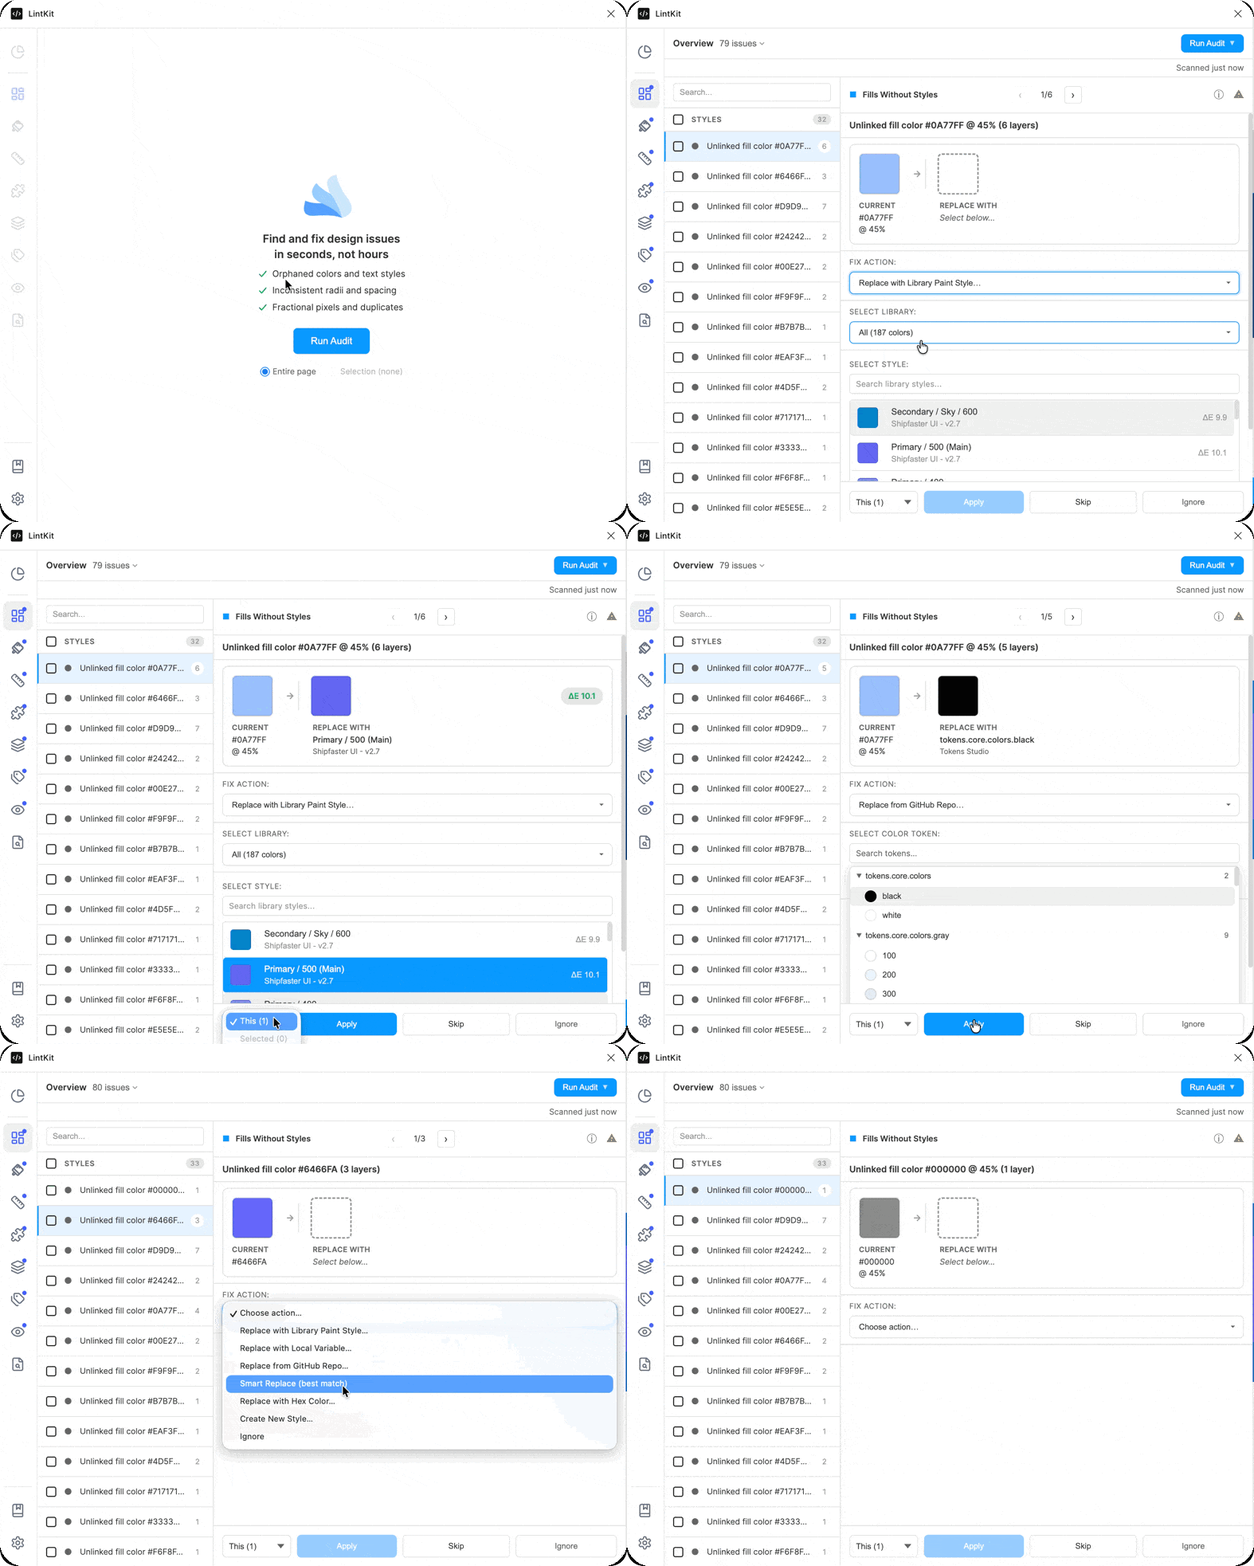 Most findings include a primary suggested fix. For example, an orphaned fill might suggest "Map to Primary/Blue" — the closest matching style in your file.
Some findings offer multiple fix options. For example, an orphaned fill might let you map to a style, bind to a variable, or create a new style.
Apply the fix to:
* **This instance** — fix just the selected node
* **All in this finding** — fix every node grouped under this finding
Click the fix button. LintKit applies the change and removes the finding from the results.
Every fix is a separate undo step in Figma. Press **Ctrl+Z** (or **Cmd+Z** on Mac) to undo immediately.
### Fix confidence
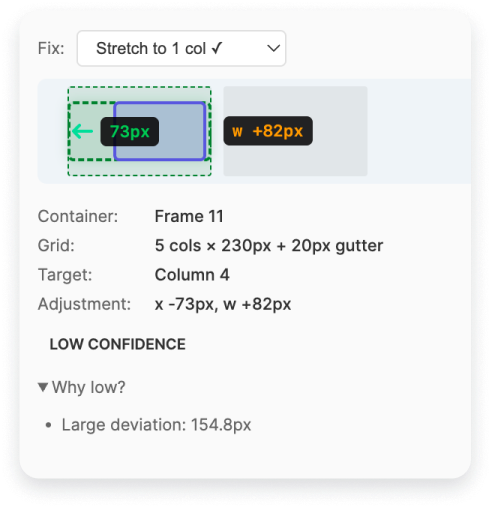
Not all findings can be auto-fixed with equal safety. LintKit shows a confidence level:
| Confidence | Meaning | Example |
| ----------------------------- | -------------------------------------------------------------- | ------------------------------------------------- |
| **High** (auto-fixable) | Safe to apply — changes a single property without side effects | Snapping padding from 7px to 8px in auto-layout |
| **Medium** (review suggested) | Likely correct but could affect layout | Changing element width or height |
| **Low** (manual fix) | LintKit can't auto-fix safely — provides instructions instead | Adjusting gaps between layers in a freeform frame |
Most findings include a primary suggested fix. For example, an orphaned fill might suggest "Map to Primary/Blue" — the closest matching style in your file.
Some findings offer multiple fix options. For example, an orphaned fill might let you map to a style, bind to a variable, or create a new style.
Apply the fix to:
* **This instance** — fix just the selected node
* **All in this finding** — fix every node grouped under this finding
Click the fix button. LintKit applies the change and removes the finding from the results.
Every fix is a separate undo step in Figma. Press **Ctrl+Z** (or **Cmd+Z** on Mac) to undo immediately.
### Fix confidence
Not all findings can be auto-fixed with equal safety. LintKit shows a confidence level:
| Confidence | Meaning | Example |
| ----------------------------- | -------------------------------------------------------------- | ------------------------------------------------- |
| **High** (auto-fixable) | Safe to apply — changes a single property without side effects | Snapping padding from 7px to 8px in auto-layout |
| **Medium** (review suggested) | Likely correct but could affect layout | Changing element width or height |
| **Low** (manual fix) | LintKit can't auto-fix safely — provides instructions instead | Adjusting gaps between layers in a freeform frame |
 ### Ignoring findings
If a finding is intentional (for example, a one-off spacing exception), click **Ignore** to dismiss it. Ignored findings:
* Persist across scans
* Can be scoped to the file (everyone sees it ignored) or just you (personal), depending on your [configuration](/configuration)
* Can be shown as dimmed results if you enable **Show ignored in results** in settings
## Configure for your team
The default settings work well for general use. For tighter enforcement, configure LintKit to match your design system:
Click the **Settings** tab in the plugin's navigation.
### Ignoring findings
If a finding is intentional (for example, a one-off spacing exception), click **Ignore** to dismiss it. Ignored findings:
* Persist across scans
* Can be scoped to the file (everyone sees it ignored) or just you (personal), depending on your [configuration](/configuration)
* Can be shown as dimmed results if you enable **Show ignored in results** in settings
## Configure for your team
The default settings work well for general use. For tighter enforcement, configure LintKit to match your design system:
Click the **Settings** tab in the plugin's navigation.
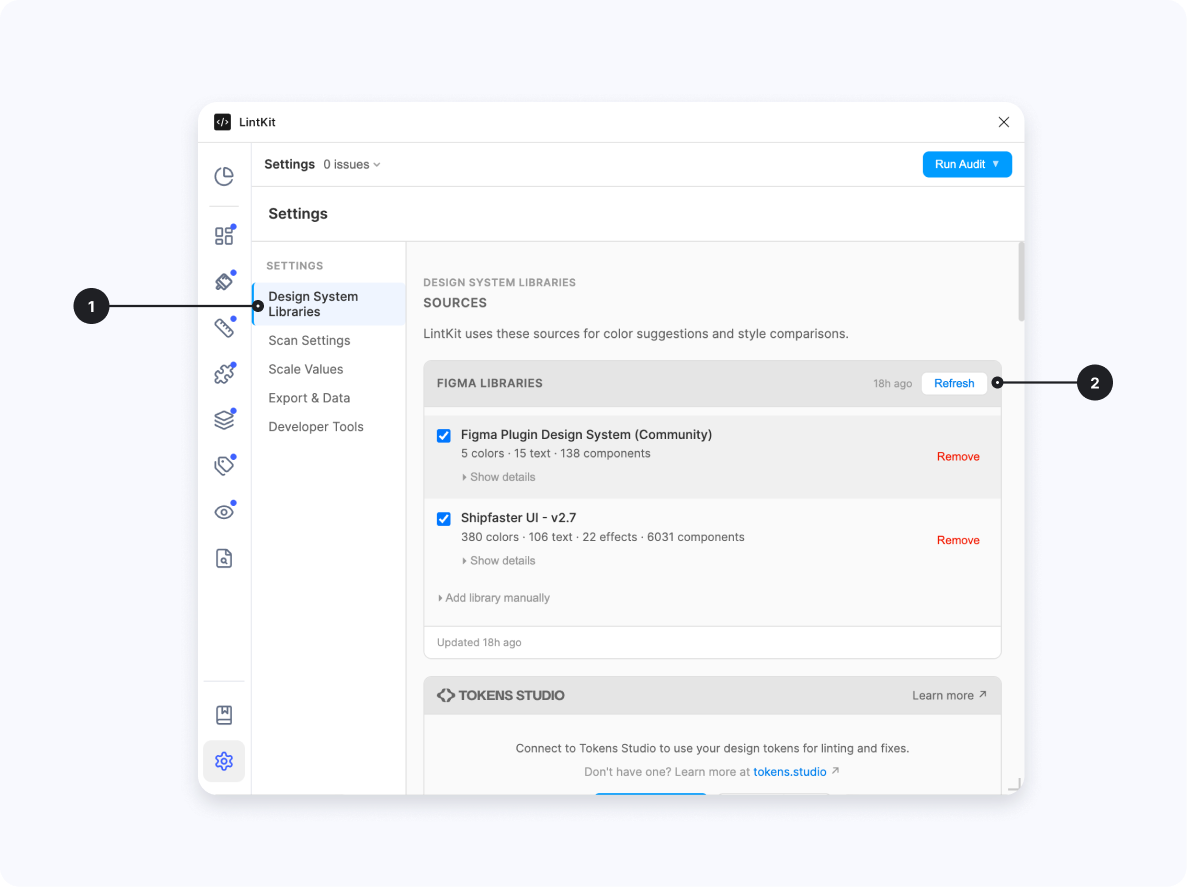 1. **Settings tabs** — switch between rule configuration, integrations, and other options
2. **External library manager** — manage which design libraries LintKit uses for color matching and style suggestions
Library loading can take a minute for large libraries with many styles and components.
If your team uses an 8px spacing grid, enter your allowed values (e.g., `0, 4, 8, 16, 24, 32, 48, 64`) and enable the **Spacing Scale** rule.
Enter the corner radius values your design system uses (e.g., `0, 4, 8, 16`) and enable the **Corner Radii** rule.
If your team uses Tokens Studio or stores tokens in GitHub, connect them in the **Integrations** section to auto-configure spacing, radii, and color rules. See [Tokens Studio](/integrations/tokens-studio) or [GitHub](/integrations/github) for setup.
See [Configuration](/configuration) for a full guide to every setting.
## Category navigation
1. **Settings tabs** — switch between rule configuration, integrations, and other options
2. **External library manager** — manage which design libraries LintKit uses for color matching and style suggestions
Library loading can take a minute for large libraries with many styles and components.
If your team uses an 8px spacing grid, enter your allowed values (e.g., `0, 4, 8, 16, 24, 32, 48, 64`) and enable the **Spacing Scale** rule.
Enter the corner radius values your design system uses (e.g., `0, 4, 8, 16`) and enable the **Corner Radii** rule.
If your team uses Tokens Studio or stores tokens in GitHub, connect them in the **Integrations** section to auto-configure spacing, radii, and color rules. See [Tokens Studio](/integrations/tokens-studio) or [GitHub](/integrations/github) for setup.
See [Configuration](/configuration) for a full guide to every setting.
## Category navigation
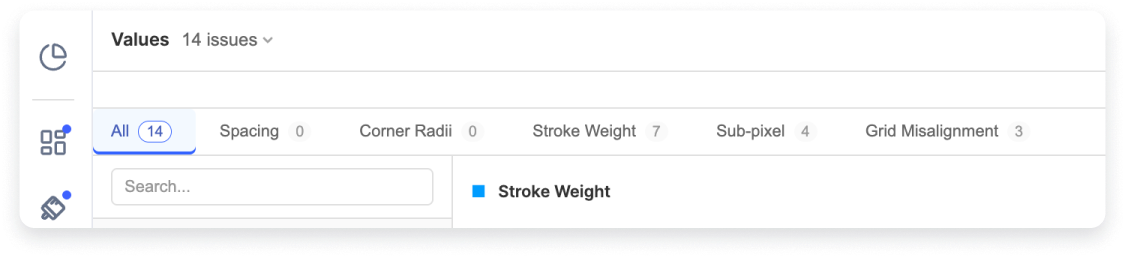 Use the navigation tabs on the left to filter findings by category. Each tab shows findings from related rules — for example, the **Styles** tab shows orphaned fills, strokes, text, effects, and grids.
## Compact view
LintKit adapts to narrow plugin windows with a compact layout that works on smaller screens.
Use the navigation tabs on the left to filter findings by category. Each tab shows findings from related rules — for example, the **Styles** tab shows orphaned fills, strokes, text, effects, and grids.
## Compact view
LintKit adapts to narrow plugin windows with a compact layout that works on smaller screens.
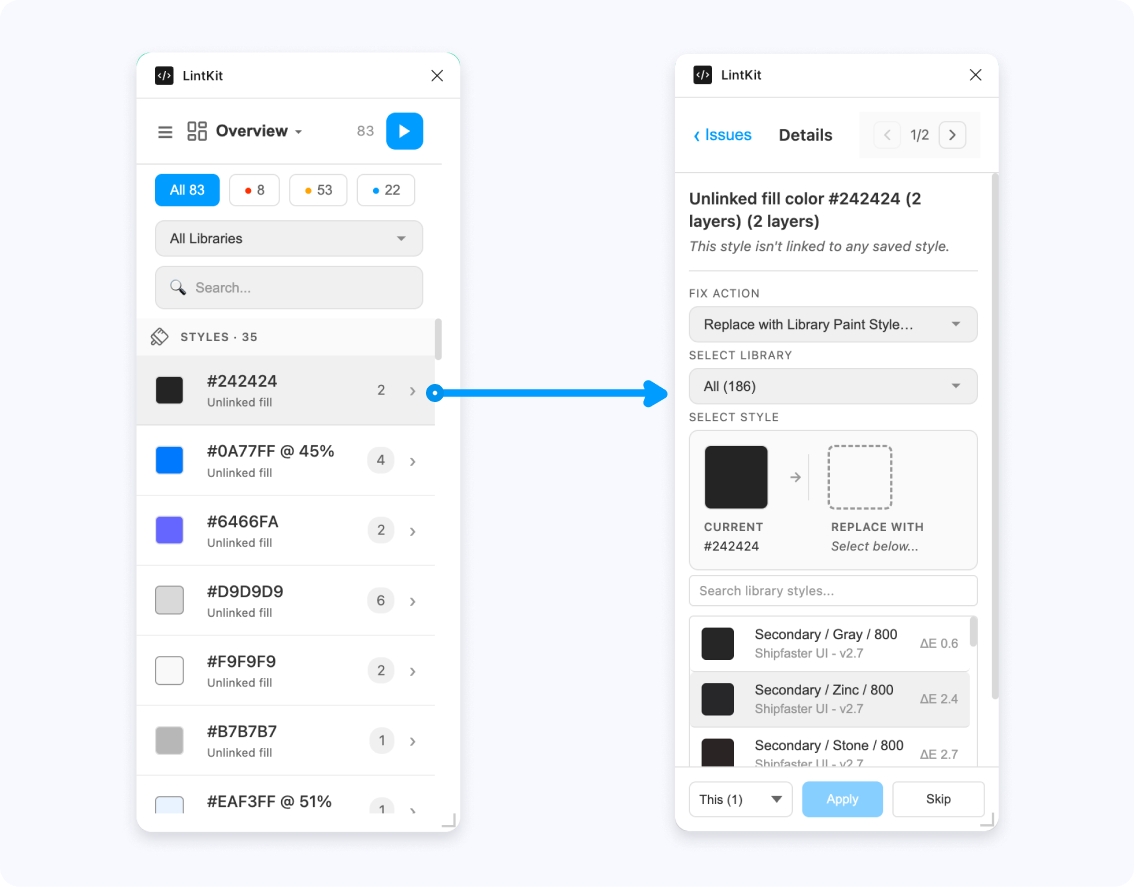 The left shows the compact findings list, and the right shows the inspector panel when you tap a finding. All fix capabilities remain available regardless of window size. See [Compact view](/features/compact-view) for details.
## What's next?
See all 24 rules, what they check, and how to fix their findings.
Set up spacing scales, radii, color tolerances, and library governance.
Understand your compliance score and handoff readiness.
Auto-configure rules from Tokens Studio or GitHub token files.
The left shows the compact findings list, and the right shows the inspector panel when you tap a finding. All fix capabilities remain available regardless of window size. See [Compact view](/features/compact-view) for details.
## What's next?
See all 24 rules, what they check, and how to fix their findings.
Set up spacing scales, radii, color tolerances, and library governance.
Understand your compliance score and handoff readiness.
Auto-configure rules from Tokens Studio or GitHub token files.